We decided to build a pizza oven because we love fires, outdoors and entertaining. We used brickwoodovens as our resource. They provided us with a detailed instruction manual on how to build the oven and an online store to purchase some of our materials. The owner of the company was also a wonderful resource and very helpful when we had questions along the way. We could not have completed this project without them.
We decided to build the Insulated Mattone Barile Grande. I am glad that we went with that choice because it is large enough to bake multiple pizzas and we like the fact that the outside does not get hot so our kids would not get burned if they touch it. It allows for 1050 sq inches of cooking surface.
First we needed to find a spot to build the oven. We wanted it close enough to the house so that we could easily check on it. We also wanted it in a spot that could accommodate a patio near it for entertaining. We built a template out of boards the size of the oven and we moved it around to where we thought it would work well. We also decided to add a counter top of each side of the oven to use as a work space.
Because we live in Minnesota, we decided to have frost footings. The instructions do not include this but we were afraid that our cold winters would cause heaving of the slab and eventually crack our oven. First we had to dig out the existing landscape and boulders. Our soil is clay so it took us an entire weekend to hand dig out the hill to get the the level to put in the slab as the base for our oven.
Then we used 1 x 6's to form the base of our slab. We used our template to guide us in the size to build the forms. We used concrete block to build the walls. My husband was a bit worried about the angle we created on the right for the counter top. I had found a picture online of an angled counter so I said " If they can do it so can we, we will just have to be creative!"

Next, we had to dig footings. We dug 48 inches down. After digging thru all the clay for the slab, we decided to make our life easier and rented a gas auger. We rented it from Ruddy's Rental in North Branch for a few hours one weekend. We made 8 holes throughout the space. We then put 4 pieces of rebar in each hole and got to work making concrete. Since we were already renting the auger, we decided to rent an electric mixer to make the concrete as well. (Versus mixing it by hand in a wheelbarrow). We could have bought concrete from a truck but it is much more expensive and you have to pay a large load fee no matter how much concrete you need. We headed off to Menard's and came back with many bags! They are 60 pounds each so we both got a workout loading them off the truck!
We filled the holes with concrete. Next we ran rebar across the holes and throughout the form. This makes the concrete hold together better if it cracks.
Then we made more concrete from the sacks and poured it into our form to make the concrete slab. By the end of this process we were very glad to have rented the mixer so that we did not have to hand mix all that concrete in the wheelbarrow. In all we used 51 bags of concrete mix!
Next we troweled the concrete to make it smooth and let it dry for a few weeks.
Once it was dry, we drilled holes in the concrete to place the rebar which will hold the cement blocks together. We laid out where we wanted the walls to be and made a hole so that each opening of the block could have a piece of rebar in it. We did not want these blocks to go anywhere!

Now it was time to start laying the block, which we picked up at Menards. We also decided that instead of renting a mixer, it would be a good investment to purchase one. We were able to find a nice used one on Craigslist. We would sure put it to use by the time the project was over! We laid the block according to the lines we had already drawn out on the concrete. This helped us to lay them straight. We put mortar on the concrete slab and then set down the block. We then put mortar on the side and bottom of the next one and put the two up against each other. These block are very heavy and the mortar got messy and sloppy. I have a huge appreciation for people that lay block for a living!. It was harder then I thought it was going to be. The mortar goes on uneven so you really need to examine each block to make sure it is level both horizontally and vertically. If you make a mistake, however, it is okay because you can accommodate for it on the next level. It was not very pretty but we knew in the end it would be covered up. We went up 5 courses for the oven and4 for the counter spaces on each side. Looking back I wish that we would have only gone up 4 courses on the oven. You end up adding several other layers of material that will be discussed later and the end product is quite tall. I may even need to use a stool at times to fully reach it!

After completing the block work, we had to core fill each of the block. So all the holes had concrete poured into them, with the rebar also sticking out. This oven could withstand a tornado for sure!
After it was hard, we cut the excess rebar off with a saw.
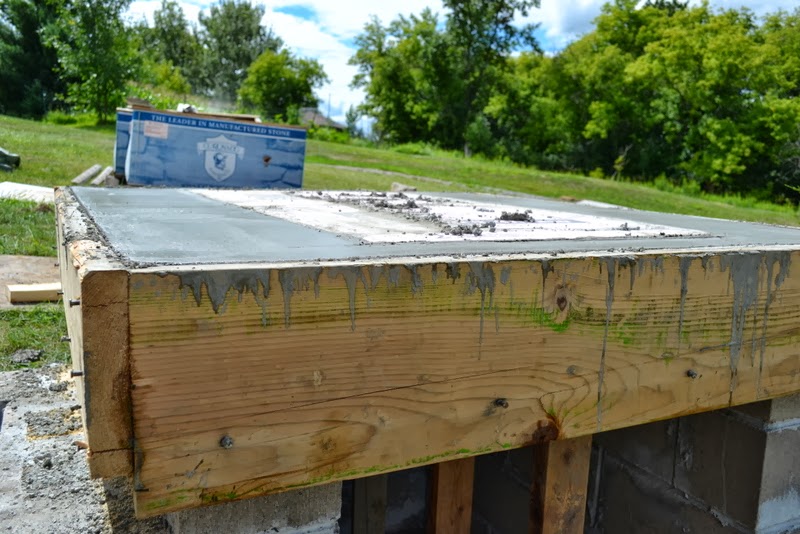
Now we were ready to begin making the slab that the oven will sit on. The original instructions have you build a form on the ground, in several pieces and then lift it on top of the block. We were afraid of it breaking if we did this so we built the form in place. Luckily my father-in-law helped with this. The form was build a bit larger then specifications to accommodate for the block we used next to the oven for the counter top space. Inside the form, we placed a piece of foam. This created a void when we poured concrete into the form. In the void was a special mix of concrete that can withstand high temperatures.
The pink insulation is then taken out (in pieces) once the concrete around it is very hard. In this open space we put a mixture of concrete and vermiculite (found at Menards). We mixed it with the sacrete and water in the mixer and poured that on the slab to harden. The end result is a somewhat spongy concrete that will allow for expansion when heated.

Next, it was time to lay the brick that will form the outside of the slab. We ended up getting to use some brick that we used when we built our house 13 years ago that was being stored at the Grandparent's house. Laying brick is much much harder then I ever thought it would be. You need patience and a quick hand. The trouble I had was going too slow as I was trying to make each brick level in all directions. You need to put mortar on the top, and sides and then put them together like legos. If you do not use the exact correct amount of mortar on each, then become very uneven. I learned that the experts are able to lay them quickly and then can level them in groups instead of each individually. Needless to say they are not even, but I am still happy to say that I did it!

Once the mortar is a bit hard, you go back and score the grout joints with a jointer to make them smooth. I was very messy with my mortar so a lot got on the bricks. The next morning I was able to brush some of it off with a wire brush, but to make it even look better, we plan to wash them with acid.

Because our slab was made a bit larger then the specs said, we needed to add one extra row of bricks on the insides. Now we were ready to make the actually heating surface for our oven! Over the vermiculite/concrete slab, we poured sand. We needed enough so that the firebrick we would be placing on it would be level with the bricks around it. This was also more difficult then I thought it would be. The concrete bricks are laid vertically and the firebricks are laid horizontally so there is quite a bit a difference to make up for. We had a difficult time finding where to get the firebrick. You can buy boxes of 6 at Menards but those firebrick are not thick enough. We ended up getting them from a pottery store in Minneapolis called Continetal Clay. The firebrick were then laid out in a herringbone pattern on top of the sand. There is no mortar between the bricks and you just need to try to fit them closely together. Bricks were cut with a saw to accommodate the ends and corners. Now that the surface was done, we moved onto the oven itself, finally! This was an exciting day to start building the actual oven. It was finally time to open the box from Brickwood Ovens that had the foam form that would help us create the dome shape of the oven. The mortar we used between the firebrick had to be a special fire mortar that can withstand high temperatures. You can buy Fireclay mortar already mixed and ready to go in buckets but it is very expensive. We followed the directions from Brickwoodovens and made our own. Besides the Fire clay,(bought in 50 pound bags from Continental Clay) we needed Portland cement, Silica sand and lime and we were able to get those at our local Menards.


This is the foam form we used by Brickwood ovens. The specs have very specific directions about how many firebricks we would need to cut and how to prepare the firebricks. To help the fire mortar stick better, we had to soak the firebricks in water for 20 minutes before we used them.
The fire mortar is the consistency of clay so it is a little easier to work with. There are ridges on the form that you follow for your joints. As you get to the top, there is more mortar between the bricks to accommodate for the arch. The back panel is layered like you would regular brick and starting from the middle so that the ends are cut. As can be seen, I was very messy with my mortar so the firebricks are covered and messy but in the end this will not matter because they too will be covered up!
We then used 4 bricks for each layer to surround what will be the chimney. We got a chimney kit from Brickwoodovens that fit nicely on our opening.
Now it was time to insulate it! We got the insulated blanket form brickwood ovens as well. We followed the directions to cover the oven in two layers of insulation.
Make sure you wear gloves and a mask! It was hard to cut thru but once it was on, we could mold it into place with our hands. Next we covered the insulation with lath. This is what the stucco adheres to. We cut pieces of lathe to fit over the oven and secured it with wire.
Next we mixed up stucco (bought at Menards) We added the dry mix to water in the electric mixer. We then start covering the oven. We knew this would only be our first coat so we were not too worried about how it looked. We tried to smooth it our as much as possible.
Once the stucco was dry, we cut off the excess lath that was covering the front. We also had to brush off a lot of excess stucco mortar that fell onto our brick. We are definitely messy masons! Once this was all dry (about a week) it was time to take out the form. This did not come out as smoothly as I had hoped, probably because I was so messy with my mortar, but after chipping away we were able to get it out!
Because we had already learned that we are not experts at laying brick, we wanted to have the front of our oven look nice so we asked our dear neighbor to help us. We decided to close off part of the front of the oven to help retain some of the heat. We used just regular mortar and not firemortar to adhere the bricks. We had our landscaper do the final stucco coat on the oven using a color additive to match the color of the brick. We also covered the mason bricks with stone veneer. This itself was quite a process. The mortar has to be just the right consistency or when you apply it to the stone, the stone will just fall off. Thankfully we had the guidance of another dear neighbor to help us in this process. Once the stones are all on, you go back with a grout bag (like piping frosting on a cake) and fill in the spaces between the stones with mortar. Again very very messy for a novice but luckily the stones clean up pretty well. For the counter tops, we went to Northland landscaping and found their largest stones. We got two pieces of Bluestone and put them on top. They still need to fit for size a little better but they are still functional and much less expensive then granite or limestone would have been.


This is our first firing. the bricks need a chance to dry out slowly so they do not crack There are specific instructions at Brickwood ovens on how to dry it out over 6 days.
 |
| Final Stucco |
We are now all ready for our first Pizza party!
They are
very talented and did a wonderful job!
I found a great book called The Art of Wood Fired Cooking by Andrea Mughaini. It has good information about how to fire up a wood oven to get the best heat coverage and receipes too. Cannot wait to report back about cooking up our first pizza!